This lesson is a simple tutorial explaning how to control Arduino UNO Ports using Android’s Bluetooth. Bluetooth is a type of wireless communication used to transmit voice and data at high speeds using waves of radio. It’s widely used in mobile phones for making calls, headset and share data. This type of communication is a cheap and easy way to control something remotely using arduino.

Figure 1 - LED Control Circuit and Android Phone
HC Bluetooth Module
HC Bluetooth module has 4 pins to be connected to arduino, they are:- RXD : RXD will receive data from arduino
- TXD : TXD will send data to arduino
- VCC : VCC is the power supply (3.3V 6.6V)
- GND : GND is the ground


Figure 2 - HC 07 Bluetooth Module
You have to pay attention about the RXD level, some modules work with 5V, but this one works with 3.3V, and arduino TX will send a 5V signal, then it needs a voltage divider.

The formula above we have R1 = 1,2 K R2 = 2,2 K Vin = 5v.
Solving for Vout we get: Vout = 5 x 2,2 K / (2,2 K + 1,2 K ) = 5v x 2,2 K / 3,4 K = 3.24 V
Essentially, you can use any combination of resistors, as long as R2 is twice the value of R1.
If you do not have resistors handy, you can use a positive 3.3v voltage regulator. Connect the Input pin of the voltage regulator to the Arduino TX line, the Ground pin to the Arduino Ground and the output pin of the voltage regulator to the JY-MCU RX line.
If you do not have resistors handy, you can use a positive 3.3v voltage regulator. Connect the Input pin of the voltage regulator to the Arduino TX line, the Ground pin to the Arduino Ground and the output pin of the voltage regulator to the JY-MCU RX line.
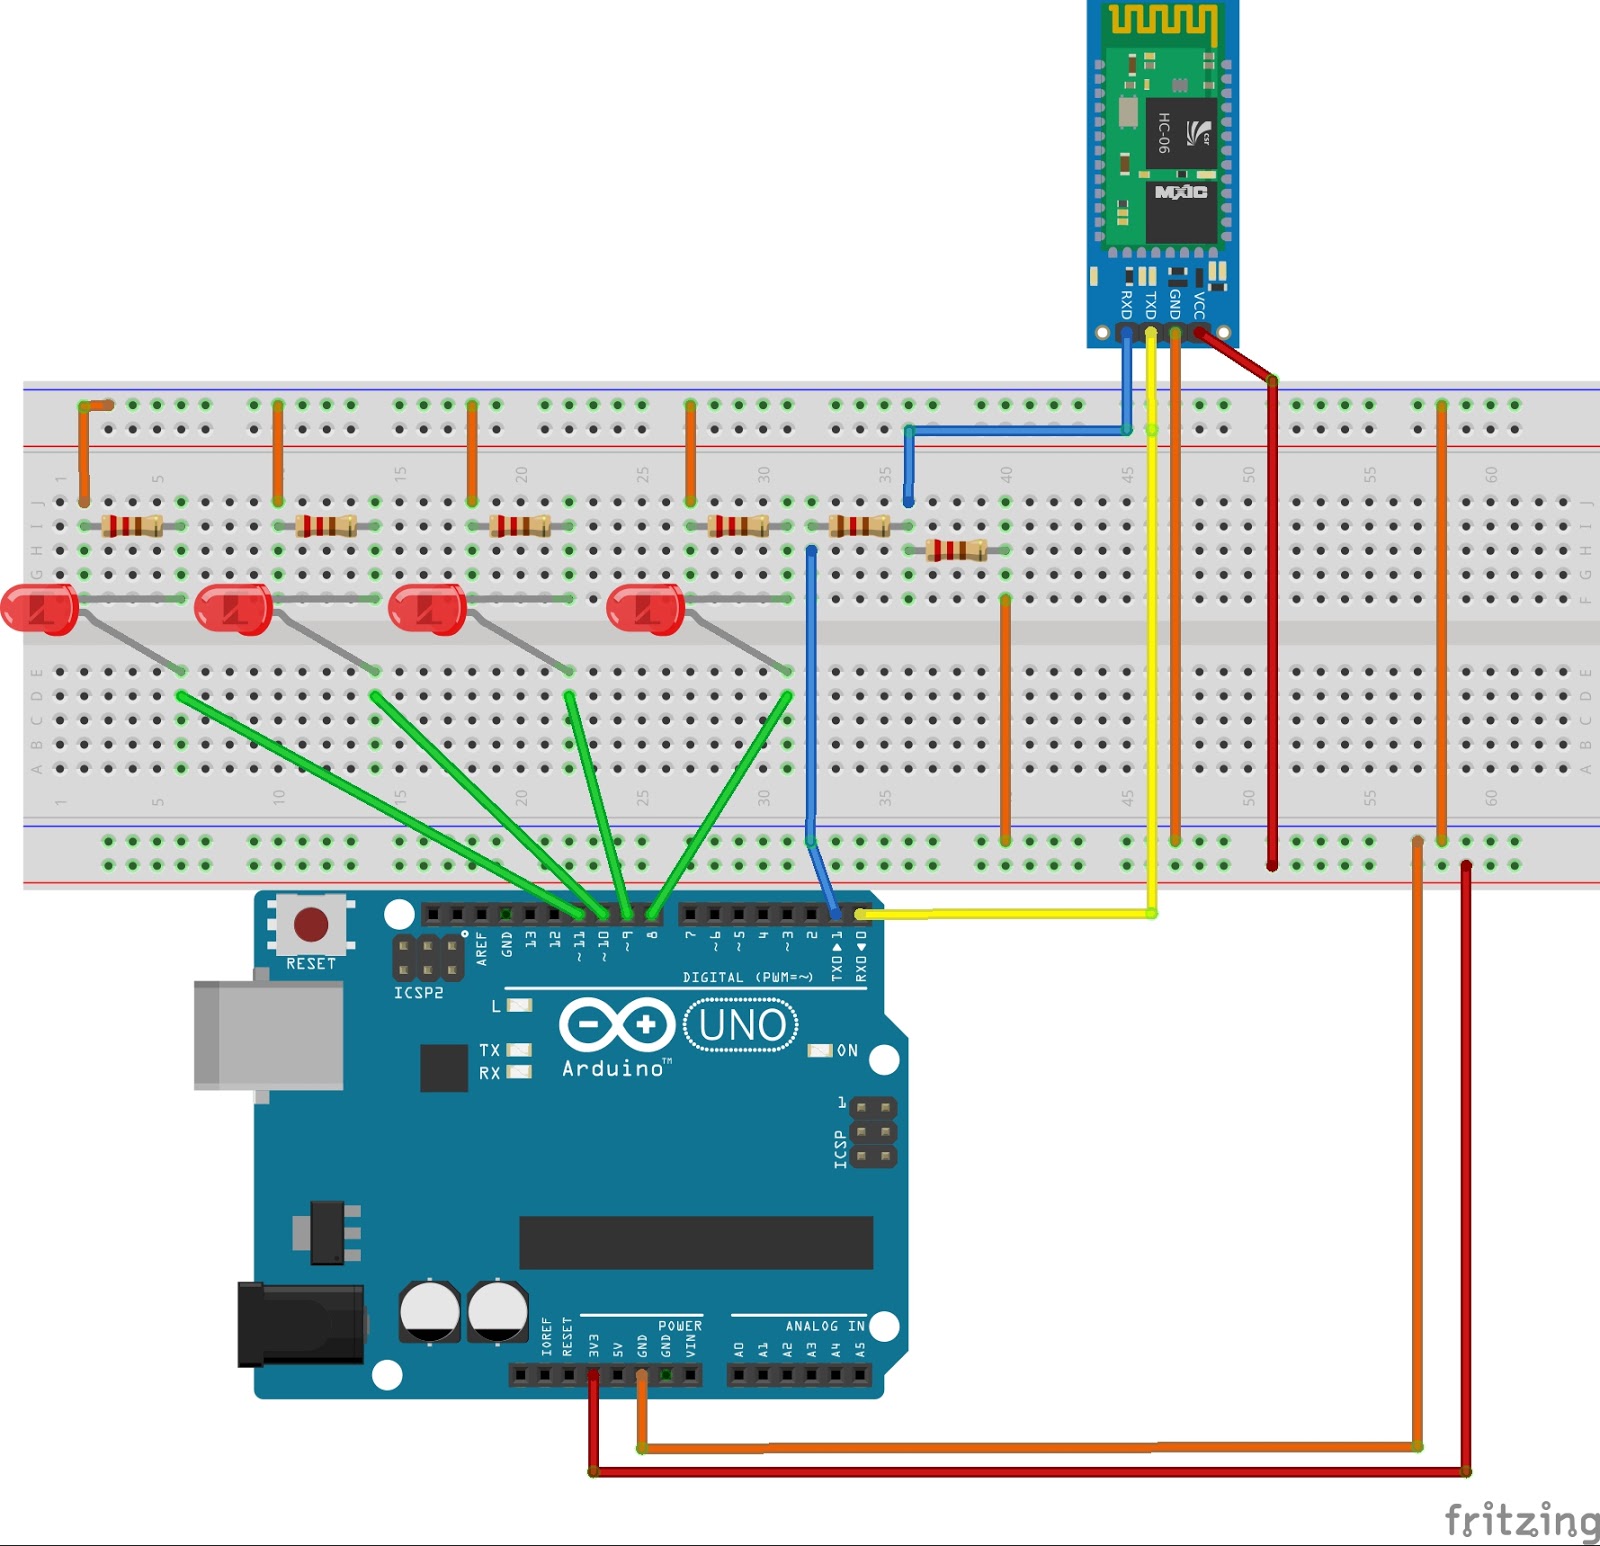
Figure 3 - The connection circuit of Arduino UNO and HC 07 Bluetooth Module
ARDUINO UNO Program
const int LED [] = {8,9,10,11};// Array of Port Numbers
char x;
void setup() {
Serial.begin(9600);// Serial Port Baund Rate
for(int i=0; i<=3;i++)
{
pinMode(LED [i], OUTPUT);
}
}
void loop() {
if( Serial.available() ) // if data is available to read
{
x = Serial.read(); // read it and store it in 'x'
}
if( x == 'a' )// if 'a' was received
{
digitalWrite(LED[0], HIGH);
digitalWrite(LED[1], LOW);
digitalWrite(LED[2], LOW);
digitalWrite(LED[3], LOW);
}
else if(x=='b')// if 'b' was received
{
digitalWrite(LED[0], LOW);
digitalWrite(LED[1], HIGH);
digitalWrite(LED[2], LOW);
digitalWrite(LED[3], LOW);
}
else if(x=='c')// if 'c' was received
{
digitalWrite(LED[0], LOW);
digitalWrite(LED[1], LOW);
digitalWrite(LED[2], HIGH);
digitalWrite(LED[3], LOW);
}
else if(x=='d')// if 'd' was received
{
digitalWrite(LED[0], LOW);
digitalWrite(LED[1], LOW);
digitalWrite(LED[2], LOW);
digitalWrite(LED[3], HIGH);
}
else if(x=='e')// if 'e' was received
{
//Running LED
for(int i=0; i<=3; i++)
{
digitalWrite(LED[i],HIGH);
delay(200);
digitalWrite(LED[i],LOW);
}
for(int j=2;j>=1; j--)
{
digitalWrite(LED[j],HIGH);
delay(200);
digitalWrite(LED[j], LOW);
}
}
else if(x=='q')//Veri 'q' ise(if 'q' was received)
{
digitalWrite(LED[0], LOW);
digitalWrite(LED[1], LOW);
digitalWrite(LED[2], LOW);
digitalWrite(LED[3], LOW);
}
}
Arduino UNO program runs according to the character set from the Android program. The characters is given in the table below.

Table 1 - Character Set
Basic For Android (B4A)
Android phone program is programing with the compiler "Basic For Android" . The android program name is BlueSay. BluSay use the Bluetooth port for transfering the Character Set.

Figure 4 - BluSay Program
Program Files
- Arduino Program - BT_Control.ino
- Android Phone Program - BlueSay.apk
Video Of Lesson